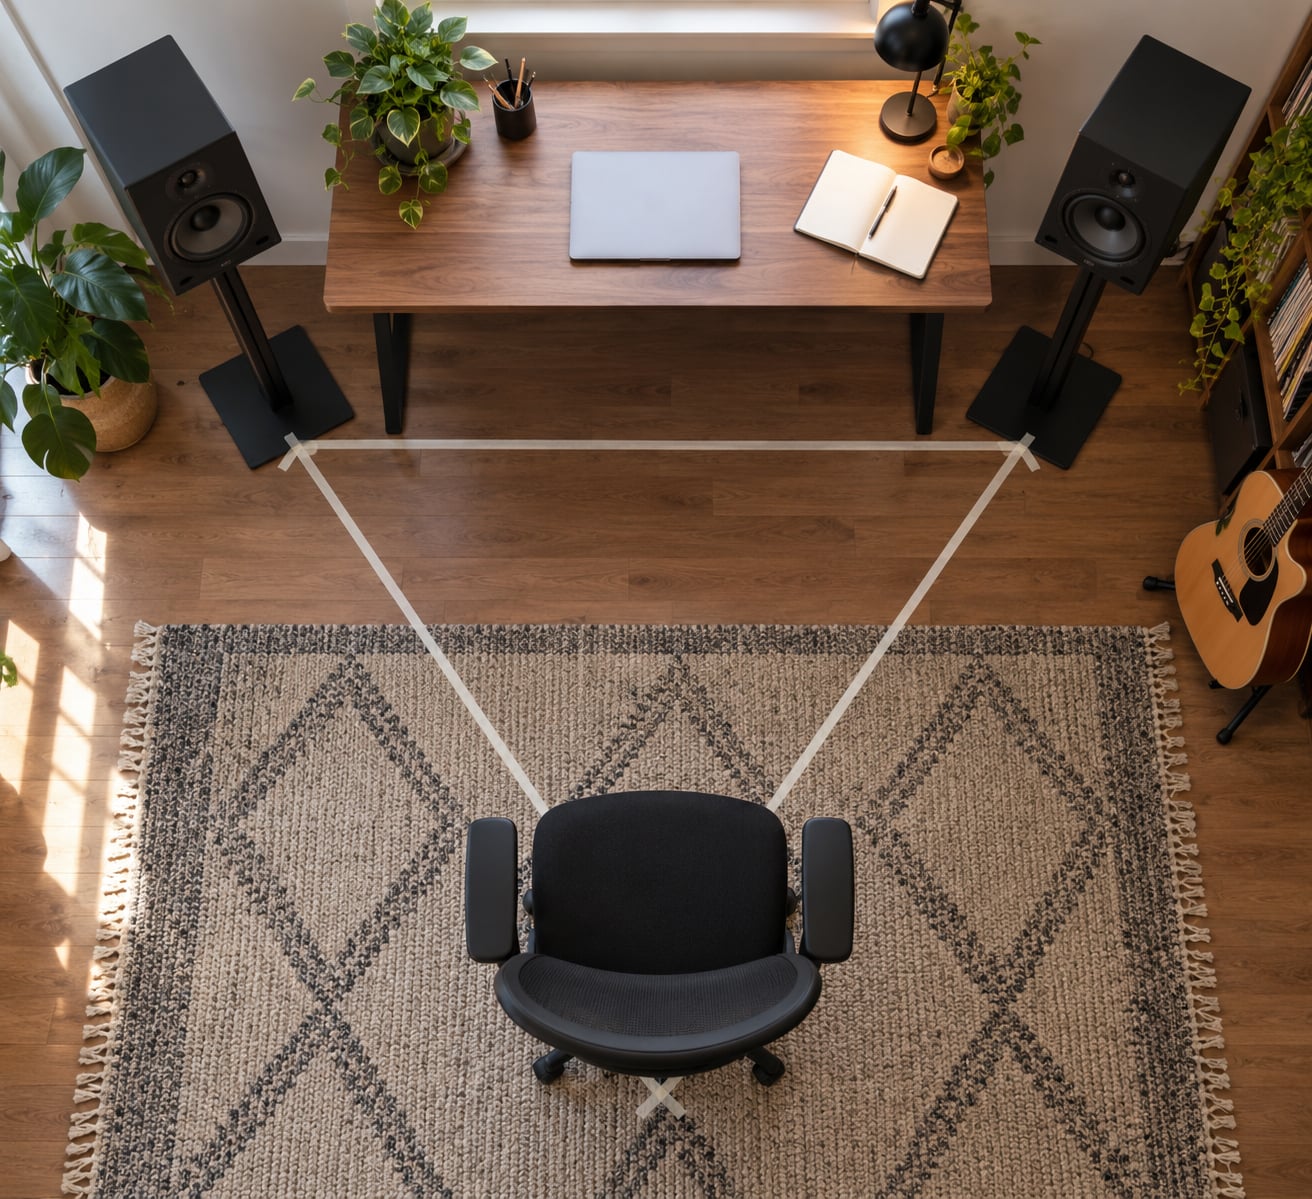
Position your monitors and your chair at three points of an equilateral triangle, toe both speakers in roughly 30 degrees so each tweeter aims at your ears, and put the tweeters at ear height. Everything else, wall distance, isolation, level, is secondary to those three. This is the short version of how to position monitors for accurate stereo imaging, and it takes about half an hour to set up properly the first time.
Most bedroom and project studios have monitors that ended up wherever the desk happened to fit. That is usually a few inches off from what the room wants, and a few inches is enough to smear the center image or pull a whole mix toward one side. The fix is mostly arithmetic and a tape measure, not new gear.
Table of Contents
- What You Need
- Step-by-Step
- 1. Measure the Room and Mark the Listening Position
- 2. Place the Speakers Symmetrically
- 3. Set the Stereo Triangle and Speaker Angle
- 4. Align the Tweeters to Ear Height
- 5. Check Distance, Reflections, and the Speaker Path
- 6. Set a Consistent Monitoring Level
- 7. Verify Stereo Imaging with a Test Track
- Common Mistakes When Positioning Monitors for Accurate Stereo Imaging
- Frequently Asked Questions
- Should studio monitors be angled inward?
- How far apart should studio monitors be?
- Should monitor tweeters be at ear height?
- Is a wider stereo image always more accurate?
- How can I tell if my stereo image is off-center?
- Conclusion
What You Need
None of this needs expensive hardware. Here is the full list of what makes the job faster.
- A tape measure. A cheap one is fine. You will use it more than you expect.
- Floor tape or masking tape. Marking the listening position and the two speaker spots on the floor so nothing drifts after a session.
- Speaker stands or isolation pads. Stands are better because they decouple the cabinet from the desk and floor. Pads are the cheap fallback if the monitors have to live on the desk surface.
- A phone level meter app. For matching level between the two channels. Any free SPL meter works.
- Three reference tracks you know well. Well-mixed commercial material, a mono compatibility check, and something with wide stereo movement. You need material you have heard a hundred times so your ear has a reference.
- A pencil and paper. Write down your measurements. Every small change you make from now on gets compared against those numbers.
Step-by-Step
This is the repeatable process. Once it is done, it takes ten minutes to re-verify after you move furniture, swap monitors, or change rooms. Working through how to position monitors for accurate stereo imaging in order, rather than one variable at a time, means you always know which change moved what.
1. Measure the Room and Mark the Listening Position
Start at the listening position, not the speakers. Sit in the chair you actually mix in, at the height you actually sit at, and find the point in the room where you want your head to live for every session. Then mark it.
A common rule puts that point about 38% of the way into the room from the front wall you face. The reason is that the back of a room is usually where a desk, a bed, and a stack of stuff already are, and the rear third of a small room is where bass problems pile up. In a 12 foot long room, 38% lands you about 4.5 feet from the front wall, which is comfortably clear of the back wall in most bedroom setups.
While you have the tape out, note what is near each speaker. Glass, a bookshelf, an open door, a bare wall, a sloped ceiling, a bed. Those surfaces are the ones that will skew the image, and asymmetric surfaces skew it more than symmetric ones.
Do not fight for the exact 38% if your room will not allow it. Symmetry matters more than the number.
2. Place the Speakers Symmetrically
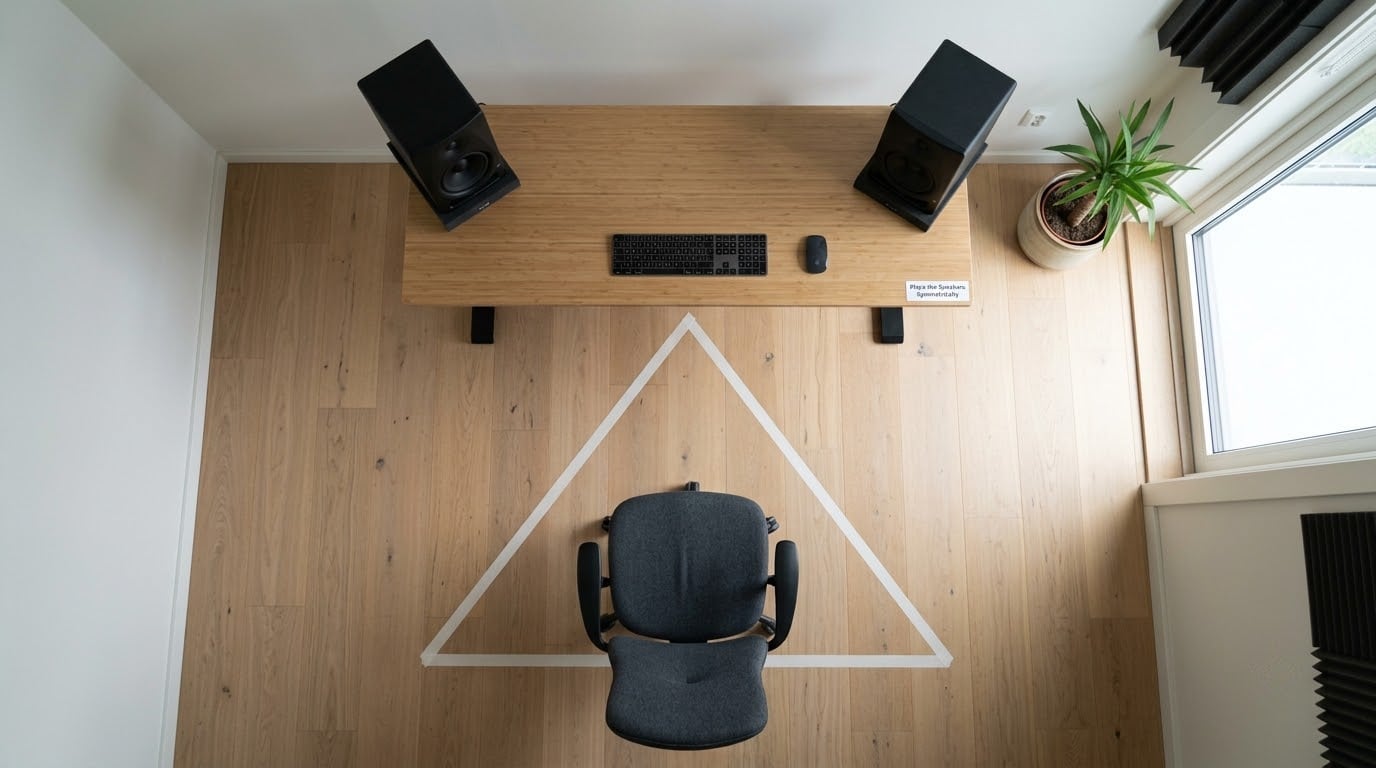
Put both speakers the same distance from your marked listening position, at the same angle to the wall. Measure from the front baffle, the flat panel the drivers are mounted in, not from the front edge of the cabinet. The difference is small but it is exactly the kind of error that puts one speaker closer than the other.
For spacing, a useful rule of thumb that gets asked about constantly is the 83% rule. Speaker separation should be roughly 83% of your listening distance. A 1.2 m listening distance gives about 1 m between the inner baffles, which is a comfortable nearfield width for most rooms.
That figure is debated and it is not a law. It is a starting point that happens to land close to what the equilateral triangle gives you in a normal room, which is why both keep showing up together.
If your room is wider than that rule allows, pull the speakers in rather than pushing the chair back. If it is narrower, accept a narrower image than you would like rather than crowding yourself into a wall.
3. Set the Stereo Triangle and Speaker Angle
The distance between the two speakers should equal the distance from each speaker to your listening position. All three sides equal, all angles 60 degrees. That is the equilateral triangle, credited to Alan Blumlein’s work in the early 1930s, and it is still the reference geometry because it equalizes arrival time and level from both channels.
With the triangle set, rotate each speaker inward until the tweeter faces your ear. That usually lands near 30 degrees of toe-in from the front panel.
Toe-in does three things. It aims the dispersion axis at your head, where the frequency response was measured, and it brings center content together into a defined phantom center instead of two separate points. It also narrows the perceived width a little, which tends to make a mix sit more comfortably on a phone speaker later.
Leave the speakers parallel instead if the triangle is very wide, if the room is short, or if you regularly move your head around while working. Extreme toe-in in a small room pulls the center focus so hard that stereo detail sits almost on top of it.
4. Align the Tweeters to Ear Height
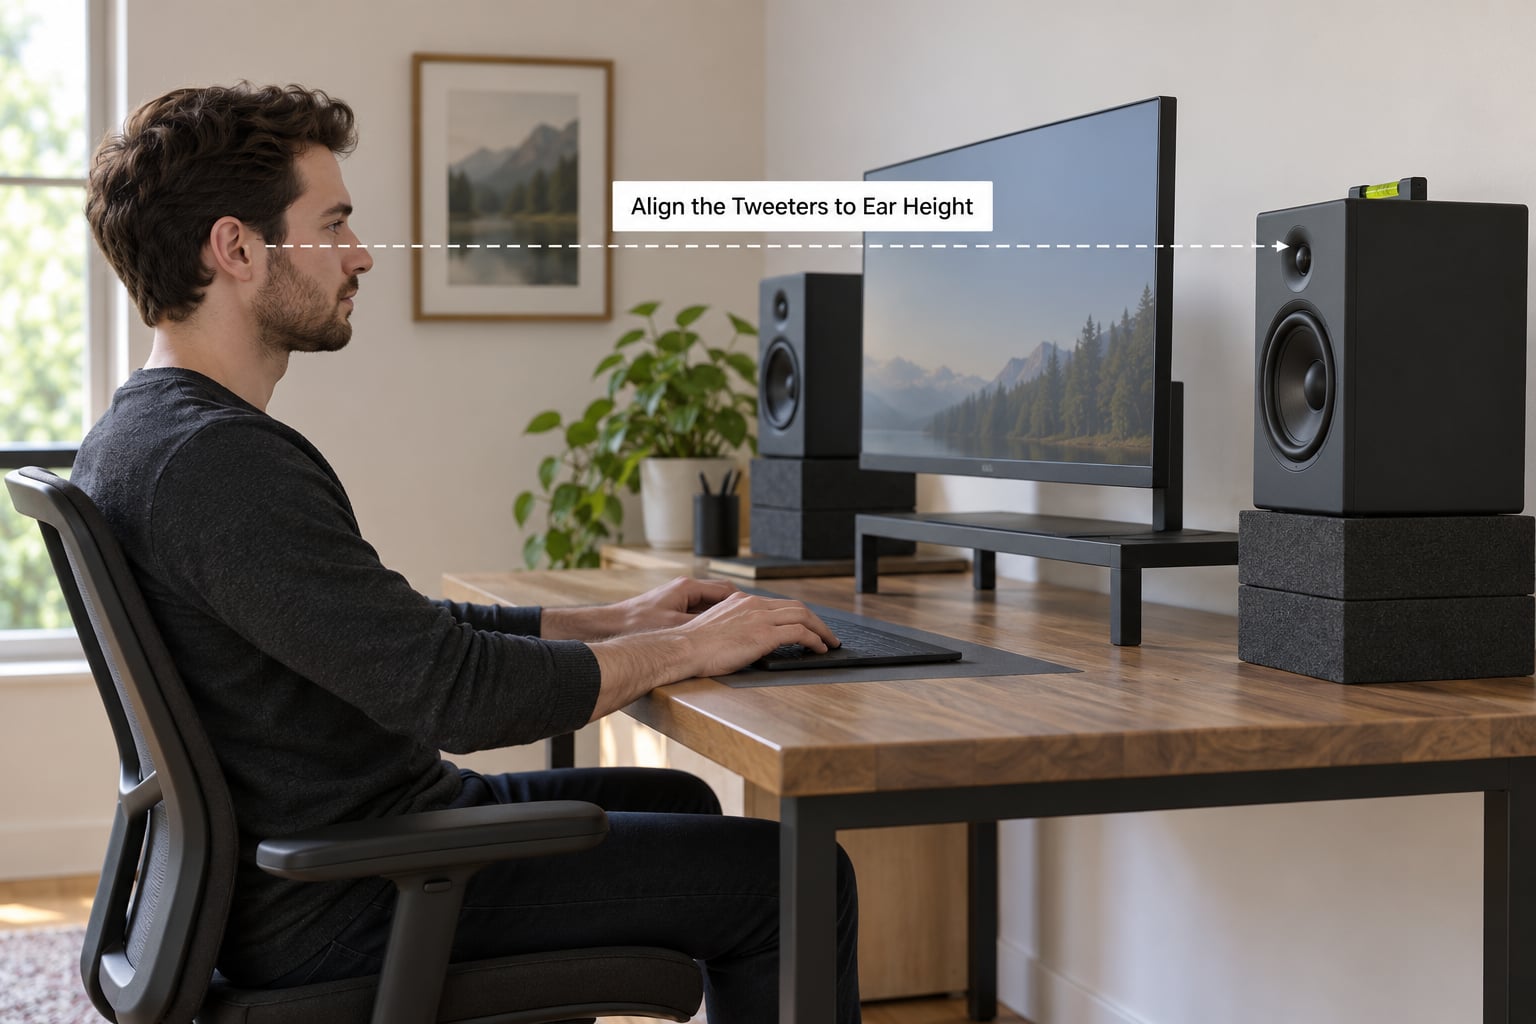
Sit in your normal mixing position and note where your ears are. That height is where the tweeters want to be. Manufacturer guidance from Genelec puts the acoustical axis of a typical two-way monitor at ear level, usually 1.2 to 1.4 m from the floor. If you are on a tall chair or a low desk, that number is useful as a sanity check rather than a target.
Get there in this order, because it is the cheapest fix first.
- Raise the speakers. Stands get you to ear height and decouple the cabinet at the same time. This is the answer for most desk setups.
- Tilt them up. If they must stay on the desk, tilt the front up with isolation pads so the tweeter aims at your ear. Good for a quick fix, but the tweeter is no longer radiating on its horizontal axis, which changes dispersion and off-axis response. Several producers on r/homerecordingstudio prefer raising over tilting for that reason.
- Move your head instead. This works when the monitors are permanently low. Adjust your chair or add a firm cushion until your ears meet the tweeter axis. It is not elegant, but it is repeatable and it costs nothing.
Whichever route you take, do it with one specific chair and one specific head position. Mixing with your head tilted down toward a laptop screen tilts your ear axis too, and you end up judging a different speaker every hour.
5. Check Distance, Reflections, and the Speaker Path
Now clear the path between each speaker and your ears. Desk edges, monitor arms, a mixing desk lip, a lamp, a microphone on a stand, a screen. Anything sitting in the near field close to the cabinet changes what reaches your ear before the sound does.
Wall distance is next. Rear-ported monitors pushed hard against a back wall are the single most common complaint about reduced and unpredictable bass. Guidance from HEDD Audio puts the rear wall at roughly 40 to 60 cm and the side walls at 60 to 90 cm for most rooms. ADAM Audio describes the same idea as zones: flush against the wall, close in, or well back at 1.5 m and beyond.
Pick one zone and stay out of the awkward middle. Close is workable if you treat the wall behind with absorption. Backed off past a meter or so works too, and buys you more distance to the listening position.
Deliberately keeping the side and rear distances different is a reasonable tactic. Matching every distance exactly can put you at the center of a symmetric corner effect, which adds bass without adding clarity.
In a tight room, move the listening position before you move the speakers. Pulling the chair back and closing the triangle often fixes more than swapping to smaller monitors will.
One more constraint in a small space: airflow. Rear-ported cabinets dump a lot of air behind them, and pushing one flat against a wall or into a corner restricts it. Keep a hand’s width behind the port.
6. Set a Consistent Monitoring Level
Put both channels at unity gain in your DAW, pull both faders to zero on the interface, and match the two speakers physically rather than in software. Play mono material or a pink noise burst, sit in the sweet spot, and adjust the speaker closest to you until the image centers on your nose. Then move to the other channel and do the same.
Software balance is a trap. It fixes what you hear and hides the physical problem. The physical problem is still there the next time you move the faders.
Once matched, set a comfortable level that you can leave alone. Loudness is not a placement tool. Mixing at a level where you are straining to hear the quiet parts is where people start compensating with volume in ways that make balance judgments unreliable.
Keep the same level for every session if you can. If you have to work late at lower levels, do it, but treat that as a different mix condition and check decisions at your normal level before you call a track done.
7. Verify Stereo Imaging with a Test Track
This is the step most guides skip, and it is the one that tells you whether any of the above worked.
The mono check. Duplicate your mix, pan both copies hard left, and listen. It should sound like one narrow, centered speaker, not two. Now pan it fully right and check again. If the balance shifts between the two, your monitors are unevenly placed or unevenly level. A voice that jumps sideways the moment you pan is a placement problem you can hear instantly.
The pan sweep. Use a test tone or a sustained synth note, hard left, sweep it to center, and continue to hard right. It should move in one continuous arc at constant apparent level. It dipping in level or changing timbre as it passes through center means the center is not solid.
The translation check. Play something you know well. Not a track you made, something mixed by someone whose ears you trust. If the low end sounds right, the vocals sit where they should, and the stereo elements stay in their own lanes without jumping, your placement is doing its job.
The head-swap check. Lean well off to one side and listen. Then the other side. In a symmetric setup, one ear will momentarily dominate and the image will pull that way in both tests. If the image pulls the same direction regardless of which ear moves, your room is asymmetric and your monitors need to move.
Make small adjustments. Half an inch of speaker movement is enough to fix a mild imbalance, and an inch and a half is enough to make things worse.
Common Mistakes When Positioning Monitors for Accurate Stereo Imaging
Almost every problem in a home studio traces back to one of these, and each one has a specific corrective action.
Mismatched speaker distance. One speaker a few inches closer than the other shifts arrival time and skews the center. Measure from the front baffle of each speaker to the front of your head and equalize. If the distance cannot be made equal, pull both back and start again from scratch.
Uneven toe-in. One speaker rotated a few degrees more than the other puts the acoustic axes on different targets. Sit centered, note where each tweeter points, and adjust until both point at the same spot on your head.
Tweeters above or below the ears. High-frequency response is never completely even off-axis, so a vertical miss colors the top end. Raise the speakers, tilt them, or change your chair height. Whichever you pick, check it against a reference track, not against how the desk looks.
Judging placement from the doorway. This is a real mistake and it is easy to make, because you walk past the setup every time you enter. The listening position is one specific chair. From anywhere else, you are hearing a different room.
Mixing from different seats. Moving around to plug in a cable or grab a coffee and then making a decision from the couch is how mixes end up with a hole in the middle. Decisions get made from the marked spot.
One speaker against a wall and one in the open. This is the classic bedroom setup, a window on one side and a bookshelf on the other. One cabinet gains bass from boundary loading and the other does not, and the stereo image tilts with it. Move both in, add absorption behind one side, or accept it and re-check your low end in mono.
Too much toe-in. Rotating both speakers past about 40 degrees toward the listening position makes the center dominant and flattens everything into it. Ease them back toward 30 degrees, or even parallel if the triangle is wide.
Mixing too loudly. Loud playback pushes the ear past its most sensitive range and flattens the differences you are trying to judge. If you cannot hold a long session at your level, it is set too high.
Assuming DSP will fix placement. Room correction software can smooth a frequency response. It cannot move a phantom center, correct arrival time differences, or make an asymmetric room symmetric. Producers consistently report it as a partial fix at best.
A few habits that pay off quickly. Mark the floor so you can always return to the same spot. Photograph the setup from above before you move anything. Re-check your position after any furniture change, since sofas and rugs shift the reflections more than people expect.
Frequently Asked Questions
Should studio monitors be angled inward?
Usually yes. Angling each speaker so its tweeter aims at your ears, around 30 degrees of toe-in from the front panel, aims the dispersion axis where the manufacturer measured the frequency response and helps a vocal or snare sit as one defined phantom center instead of two points. Leave them parallel when your triangle is very wide or your room is short, since heavy toe-in in a small space makes the center image dominate and flattens the rest of the mix.
How far apart should studio monitors be?
Use about 83% of your listening distance as a starting point, which in most rooms lands close to the equilateral triangle setup. A 1.2 m listening distance gives roughly 1 m of separation. The 83% rule is a rule of thumb rather than a physical constant, and it is debated, so treat it as your first measurement and then check the stereo image with mono material. If the image is narrow, move them apart a few inches at a time.
Should monitor tweeters be at ear height?
Yes, and the acoustic axis of a typical two-way monitor is designed to sit at ear level, usually between 1.2 and 1.4 m from the floor according to Genelec’s placement guidance. Off-axis, high-frequency response is never perfectly even, so a vertical miss colors your top end. Raise the monitors onto stands if you can. Tilting them up works as a quick fix but pushes the tweeter off its horizontal axis, so stands are the better long-term answer.
Is a wider stereo image always more accurate?
No. A wide image often means strong side reflections, a wide speaker triangle, or heavy toe-in exaggerating the space between the channels. Accurate imaging means center material is solid and unchanging, stereo elements stay in their own lanes, and the whole picture holds its shape as you move your head. Speakers pulled too far apart, or pointed too sharply inward, can make a mix sound enormous on your setup and collapsed everywhere else.
How can I tell if my stereo image is off-center?
Duplicate your mix, pan it hard left, and listen. Then pan the same file hard right. The sound should stay centered and even in both passes. If the voice or the low end jumps sideways or changes weight between the two, something is off. Swapping the left and right outputs of your interface is a second quick test. An image that pulls the same direction regardless of which ear moves usually points to an asymmetric room rather than a speaker problem.
Conclusion
Start with the chair. Mark your listening position, roughly 38% of the way into the room, then measure equal distances from both speakers to that spot and set the separation so all three sides of the triangle match. Add about 30 degrees of toe-in, raise the tweeters to your ear height, and clear anything sitting between a speaker and you.
Then run the mono check and a familiar reference track before you touch anything else. Small repeatable adjustments, verified by ear against material you trust, buy you more accuracy than any upgrade you can buy for your desk. Updated for 2026.