Professional results with stock plugins come from the order you use them in, not from how many you load. Gain stage first, level the faders, then run a fixed chain: high-pass filter, subtractive EQ, compression, de-essing or dynamic EQ, optional saturation, then reverb and delay on sends, finished with automation and a level-matched reference check.
That chain works in any DAW and on any genre. For trance and house in particular, the difference between a demo that sounds thin and one that fills a system comes down to how low end, midrange and space are handled with the processors already on your hard drive.
The rest of this guide walks through that chain step by step, with starting settings you can dial in, then the mistakes that undo good work. I use this order on my own sessions because it forces decisions in a sane order: level before tone, tone before dynamics, dynamics before space.
Table of Contents
- What You Need
- Step-by-Step: How to Use Stock Plugins to Get Professional Results
- Set Up a Clean Mixing Foundation
- Shape the Mix with Stock EQ
- Control Dynamics with Native Compression
- Add Saturation, Harmonics, and Impact
- Build Depth with Stock Reverb and Delay
- Use Stock Stereo Tools with Control
- Automate Dynamics and Space Throughout the Arrangement
- Reference, Refine, and Export the Final Mix
- Common Mistakes
- Frequently Asked Questions
- Can stock DAW plugins produce a professional-quality electronic music mix?
- Are stock plugins better than paid plugins for mixing trance and house?
- Which stock plugins should I use first on an electronic music mix?
- Will the same stock plugin workflow work in Ableton Live, FL Studio, and Logic Pro?
- How do I know when my mix is finished instead of overprocessed?
- Conclusion
What You Need
You need a session with all the tracks imported and named clearly, plus the stock processors that shipped with your DAW. Every major workstation includes an equalizer, a compressor, a de-esser or dynamic EQ, a reverb, a delay, a saturation or distortion of some kind, and a limiter. Pro Tools gives you EQ3, Dyn3 and D-Verb; Logic has Channel EQ, Compressor and Space Designer; Ableton has EQ Eight, Compressor, Reverb and Delay; FL Studio ships Fruity Parametric EQ 2, Fruity Compressor and Fruity Reverb 2; Reaper has ReaEQ, ReaComp and ReaVerbate; Studio One and Cubase ship comparable Channel EQ, Compressor and reverb plugins.
Also have a metering tool open. A loudness meter and a true peak readout tell you what your ears cannot, and most DAWs include one built in. A slow-attack, slow-release meter or a spectrum display helps you see problems before you hear them.
Two more things earn their place on the desk. One reference track you genuinely like, in the same genre and roughly the same loudness. And honest monitoring, because no plugin fixes a bad speaker or a room problem. If your mixes only sound good on headphones and nowhere else, the room is the issue, not the chain.
Menu names differ between DAWs, so translate rather than memorize. The job is the same everywhere: filter, subtract, compress, catch, add colour, place in space.
Step-by-Step: How to Use Stock Plugins to Get Professional Results
Set Up a Clean Mixing Foundation
Start by organising. Rename every track so it tells you what it is, colour the buses, and set sensible fades at clip boundaries. Ragged loops clicking on transients waste an afternoon before any plugin work begins.
Check phase alignment on doubled elements. Most DAWs have a polarity invert on the channel or plugin, so flip one copy and listen. When the combined sound gets fuller rather than thinner, keep it flipped; when it gets worse, undo it.
Now gain stage. Using the channel trim, the input gain or an inserted stock utility or gain plugin, bring each track up until peaks sit well below clipping, ideally with 10 dB or so of room. A stock compressor with makeup gain at zero, or the DAW’s gain plugin on the insert slot, works fine for this. The point is only headroom so the faders and meters behave.
Balance the faders next, without touching EQ or compression. Solo each track, set it to roughly where it sits against the kick and snare, then pan it. This is the step beginners skip and then spend money trying to fix with plugins. Once levels are honest, the rest is fast.
Shape the Mix with Stock EQ
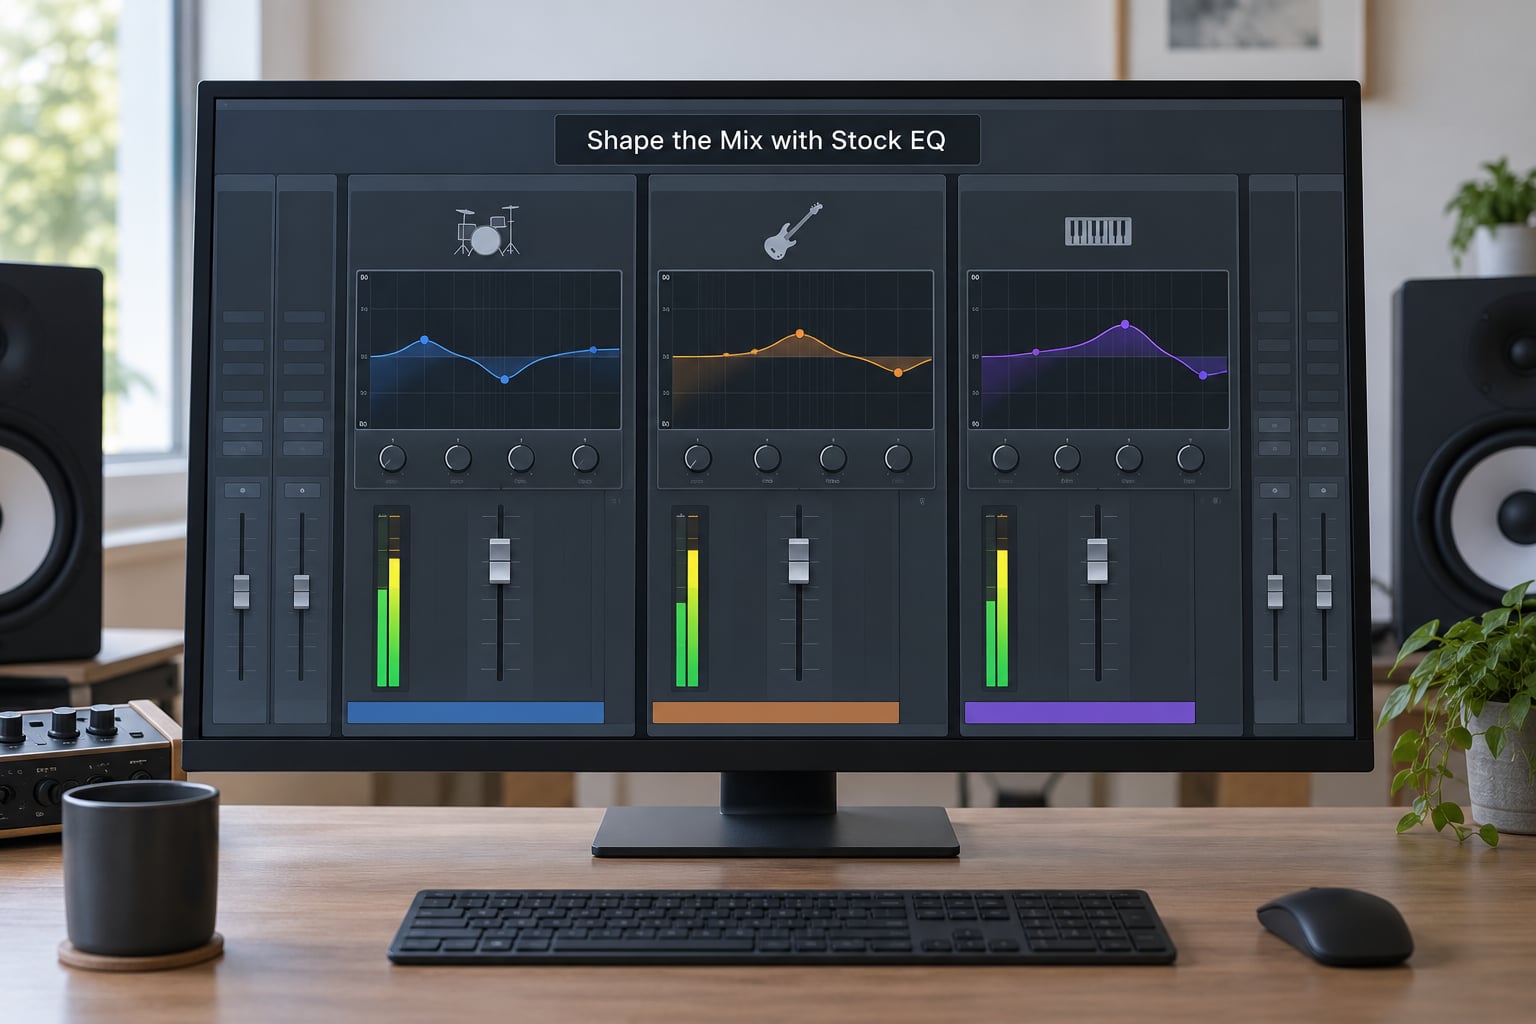
EQ comes first for a reason. Remove what should not be there before you shape what should. High-pass filter every track except your kick and bass at roughly 80 to 100 Hz, using a gentle slope, and raise it to 150 Hz or higher on vocals, room mics and any guitar reamp.
Then subtract. Set a narrow notch around 200 to 300 Hz to clear boxiness on guitars and synths, and a second notch just above your low end on the bass to carve room for the kick. On a four-on-the-floor trance record, the classic move is a high-pass with a wide resonance-free shelf on the bass or a mid-side cut in the 250 to 400 Hz area, so the kick owns 40 to 60 Hz and the bass keeps its harmonics instead of its fundamental.
Only after the cleanup do you add. A broad boost of 2 to 3 dB around 3 to 4 kHz gives presence on synths and vocals, and a gentle shelf above 10 kHz adds air without hiss. Keep every move small and use a wide Q for broad tone, a narrow Q for notches.
Two habits keep stock EQ from sounding brittle. First, cut before you boost, so you are replacing energy rather than piling it on. Second, frequency-mask deliberately: when two instruments fight in the same band, cut one of them rather than boosting both. Parallel EQ is the escape valve, putting the stock EQ on an aux send and mixing a filtered copy underneath the original so aggressive cuts do not hollow the source out.
Control Dynamics with Native Compression
Compression is a fader that moves itself, and the settings decide whether it sounds transparent or like a drum machine. Threshold sets where it starts, ratio sets how hard, attack sets what it ignores on the way in, release sets how it recovers.
Set the threshold so you see a steady 3 to 6 dB of gain reduction on the peaks you care about, not on everything. Use a ratio between 3:1 and 4:1 for most material, a 10 to 30 ms attack to let drum and vocal transients through, and a release in the 80 to 150 ms range for punchy sources. Longer release smooths pads and slower material; short release risks pumping on a four-to-the-floor pattern.
Per source, the jobs differ. For kick punch, use a high ratio around 4:1, 5 to 10 ms attack and a release tied loosely to the tempo, targeting 2 to 4 dB. For snare and clap consistency, 4:1 with 10 ms attack and 80 ms release, 2 to 3 dB. Pads and plucks want slow attack, 30 to 50 ms, and a longer release so tails stay even. Vocals need the most care: fast release and a modest ratio to catch peaks without squashing the performance. On the mix bus, a slow attack, low ratio near 1.5:1 to 2:1, and 1 to 2 dB of reduction is glue, not volume.
Use the knee where you want soft engagement, and leave it hard when you want the compressor to grab only the loudest transients. Detection mode matters too. Peak detection reacts to peaks, RMS averages the waveform, and a sidechain option lets one source trigger another, which is how you pump a pad under a kick without touching the pad’s level.
When a track still needs more control than one compressor gives, go parallel. Send the same signal to a second compressor, compress it hard, and bring it back in underneath the dry track. You get density and evenness with none of the pumping, and it is the safest way to glue a drum bus built from stock tools.
Add Saturation, Harmonics, and Impact
Saturation is the cheapest density you can get from a stock plugin. Every DAW ships a soft-clipper, a wave shaper, a tube-style saturator or a transient designer. FL Studio’s Gross Beat and Maximus, Logic’s Overdrive and Transformer, Ableton’s Saturator and Utility, Reaper’s ReaComp saturation mode, and Pro Tools’ Lo-Fi and Sans Amp all do some version of this.
Use it in two ways. Parallel colour means running a saturated copy underneath the dry signal, which thickens the track and leaves the attack untouched. Destructive processing means putting the saturator in the main path at a low drive, which thickens and softens the whole sound but can smear transients. For electronic music, parallel is usually the better bet on drums and buses, light destructive on bass and low-lead content.
Start conservatively. A drive level that sounds obvious in solo is usually too much, and pushing saturation on a noisy mix just raises the noise floor with it. A couple of dB of harmonic density across the mix bus often does more for cohesion than anything else you can add.
Build Depth with Stock Reverb and Delay
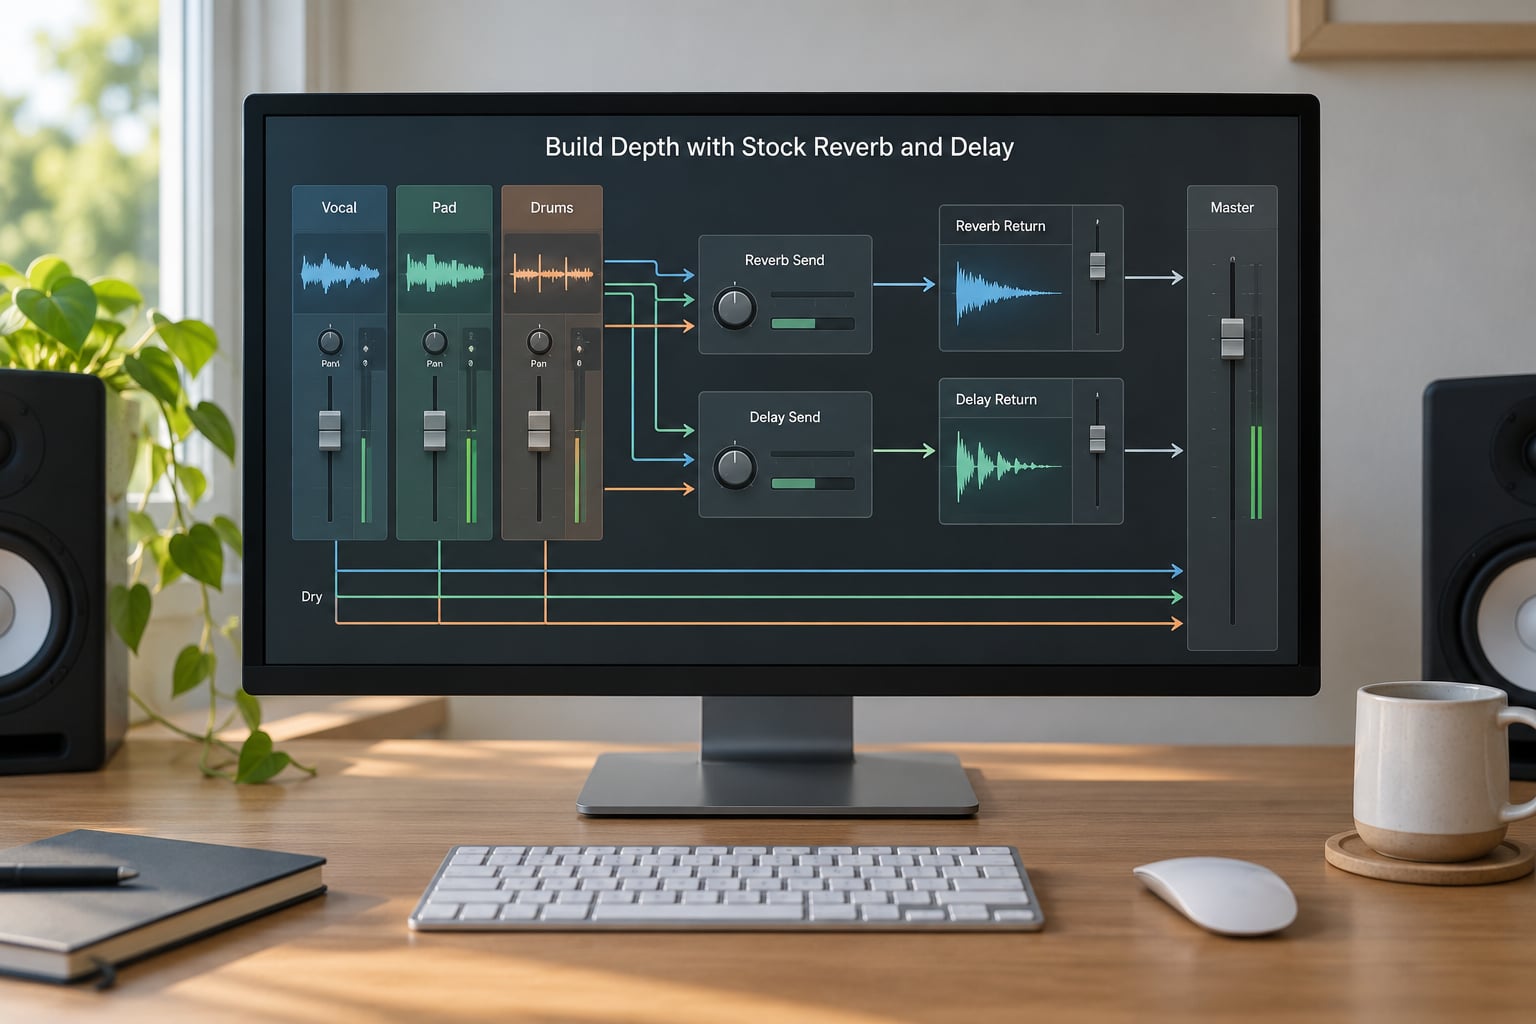
Put time effects on sends, not inserts. An insert processes the whole track, which is exactly what you do not want when a reverb should sit behind the dry vocal. On a send, the dry signal stays untouched and a fader sets how much of the effect joins it, which also means you can automate that fader later.
For reverb, set the pre-delay to 20 to 60 ms so the transient arrives before the tail, match the decay to the size you want, and filter the return. Rolling off everything below roughly 300 to 400 Hz keeps the low end from turning to mud, and pulling the top slightly above 8 kHz stops a long tail from getting sibilant. Modulation depth of a few percent keeps a long decay from sounding static.
For delay, tempo-sync it. Set the delay time to a dotted eighth or a sixteenth depending on the tempo feel, which locks echoes to the grid. Short slapback delays of 60 to 120 ms give a vocal presence without clutter, and filtered, pitched-down repeats belong on everything else. Ping-pong sends to a stereo pair widen a trance pad nicely.
Depth is a placement decision. In a house mix, kick, bass and lead stay dry and centred; clap, hats, pads and background vocals move back. Push the reverb or delay return too far and the low-mid range fills in, masking the vocal, so pull it down until you can hear the dry vocal clearly through it.
Use Stock Stereo Tools with Control
Most DAWs ship a stereo widener, a mid-side or mid-width processor, and a mono check. They are useful and easy to misuse. A widener on a mono source can be a fast way to make two channels sound identical but larger, though it does nothing a doubled, slightly detuned channel would not do better.
Work mid-side instead. Cut the mid channel around 200 to 400 Hz to reduce low-mid build-up that fights the kick, and boost the side channel gently above 2 kHz to open up a mix. Keep the bass strictly in the mid channel and check the result in mono; if it collapses, you have put something important in the sides.
Be careful with Haas-style panning, chorus and doubled channels. A short delay between the two sides of a frequency range can hollow out mono playback and blur the kick. Whenever you widen anything, play it on a mono source or fold the mix down and check that the drums still hit.
Automate Dynamics and Space Throughout the Arrangement
Static settings rarely carry an arrangement of three or four minutes. Automation is what makes a mix feel like it moves, and it is the closest thing to a free plugin.
In a trance or house track, ride the reverb send up a dB or two through the intro so the drop feels bigger, drop it during the breakdown so the vocal sits forward, and raise the bass and lead a touch when the kick leaves. Filter sweeps and risers come from automating the stock filter or an EQ sweep on a send. Ride the low end down slightly during vocal lines so the words stay intelligible.
Compression can be automated too, mostly by automating its threshold or by riding the source fader. The same value in different sections is often wrong, so revisit the chain after each arrangement change rather than setting it once and trusting it.
Draw the moves on a separate lane, keep them simple, and use the same handful of moves across the whole track. Over-automated mixes draw attention to the faders instead of the music.
Reference, Refine, and Export the Final Mix
Put your reference track up and level match it. Most DAWs have a utility or gain plugin with a trim control, and a rough match is fine: make the reference as loud as your mix, then alternate. If your mix seems quieter, it probably is. If it collapses when you switch, you have lost low end somewhere.
Run three checks before export. Play the mix in mono. Solo the low band and listen for boxy buildup around 200 to 400 Hz. Then listen at a low monitoring level, because problems masked by loud playback usually show up there first.
For delivery, leave headroom. If you are mastering from the mix, export peaking at roughly -6 dBFS and let the mastering chain do its work; pushing a mix to 0 dBFS leaves nothing to work with. A stock limiter on the mix bus is for catching peaks, not for making the track loud, and a gentle glue compressor before it is plenty. Finish with naming, format and sample rate: 24-bit files, and only render to MP3 if the destination demands it.
If the mix still feels wrong after these steps, the answer is usually simplification. Take out a plugin rather than adding one, and go back to the faders.
Common Mistakes
Processing every track. Not every source needs a chain. Fix the balance first, then only process what is still fighting for space. The trap is treating an EQ on all 40 channels as progress.
Mastering inside the mix. Limiting and multiband compression on the mix bus while still fixing levels turns mixing into guessing. Fix the mix, export with headroom, master separately.
Stacking similar processing. Two compressors or three EQ boosts of the same kind rarely help. Decide what each plugin does before you load it, and if two do the same job, keep one.
Judging at the wrong level. Louder always sounds better. Match levels when you compare, and audition quietly, because that is how the listener will hear it.
Boosting everything a little. Several small boosts stack into an over-bright, fatiguing mix. Cut first, boost second, and keep the boost under 3 dB unless a specific problem demands more.
Sending too much to reverb and delay. Wide, dense effects fill the low-mid range and bury the vocal. Pull the return down until the dry signal is clearly in front.
Wider than mono-safe. Excessive widening collapses in mono and dulls the kick. Fold down and listen before you export.
No automation, no reference. One pass at one level is not a mix. Spend ten minutes riding the arrangement and comparing to a track you respect.
The workflow that holds up: level the whole arrangement with faders and panning, choose one problem per track, make one move with one plugin, and judge it level matched. Save the chain as a template so the next session starts from the same place. Community consensus on the FL Studio forum and across production Reddit threads is the same point: the stock tools are sufficient once you can hear what they are doing, and knowing what they cannot do is what tells you whether a purchase is worth it.
Frequently Asked Questions
Can stock DAW plugins produce a professional-quality electronic music mix?
Yes. The processors included with your DAW cover everything a trance or house mix needs: high-pass filtering, subtractive and additive EQ, compression including parallel and sidechain modes, saturation, tempo-synced delay, reverb and limiting. What separates a professional result is gain staging, fader balance, correct settings and automation, none of which come from a plugin brand. Most mixes that sound thin are unbalanced, not under-equipped.
Are stock plugins better than paid plugins for mixing trance and house?
Neither is automatically better. Stock processors are built by the DAW maker to be clean, predictable and versatile, which makes them excellent for EQ, compression and gating. Paid plugins tend to win on character and speed: analog-modelled saturation, advanced dynamic EQ, spectral tools and hardware-style reverbs. Many producers use stock tools for the structural work and add one or two third-party plugins for colour once the balance is right.
Which stock plugins should I use first on an electronic music mix?
Start with four jobs: an equalizer, a compressor, a reverb or delay, and a limiter or saturator. That is enough to build a complete mix. If your DAW lacks a capable dynamic EQ, TDR Nova is the free addition most often recommended across producer forums for de-essing and resonance control. Learn those four well before looking at anything else.
Will the same stock plugin workflow work in Ableton Live, FL Studio, and Logic Pro?
Yes, because the workflow is defined by job, not by product. Each DAW calls its equalizer something different, EQ Eight in Ableton, Fruity Parametric EQ 2 in FL Studio and Channel EQ in Logic, but they all do filtering, notching and shelving. Map the job to the plugin name in your DAW and the same chain order applies unchanged.
How do I know when my mix is finished instead of overprocessed?
It is finished when level-matched comparison against your reference stops revealing gaps, the mix sounds balanced in mono and at a low volume, nothing clips, and further processing only makes it worse. Overprocessed mixes usually show three signs: a dull, lifeless top end, low end that has lost impact, and a vocal that sits behind the effects rather than in front.
Conclusion
Professional results with stock plugins come from gain staging, restrained processing, automation and reference-based decisions, not from a long insert chain. Begin by levelling the entire arrangement, then make one tonal or dynamic move at a time and judge it level matched.
When you run out of ideas, take a plugin out before you add one. That habit alone puts most beginner mixes ahead.