To use LFO Tool for sidechain ducking in Ableton Live, put it on an Audio Effect Rack return, pick either tempo-synced quarter notes or an audio input fed by your kick, then set the depth and release so the bass steps back under each hit. The whole thing takes about ten minutes.
That is the short version. The rest of this guide goes through each move slowly, because the bit that trips people up is never the plugin itself. It is deciding what triggers the duck, and then getting the envelope to land in the right place.
One thing worth saying up front: LFO Tool is a volume shaper with an LFO attached, not a plain oscillator. Gearspace regulars have complained about the name for years because newcomers open it expecting a sine wave and find a drawable curve editor instead. You will not use the filter or panner here, but knowing they exist tells you how much more the plugin can do.
Table of Contents
- What You Need
- Step-by-Step: Set Up LFO Tool Sidechain Ducking
- Choose the Track That Should Trigger the Duck
- Add LFO Tool to an Audio Effect Rack
- Assign a Gain Parameter to the LFO
- Route the Sidechain Signal and Blend the Effect
- Refine the Ducking for House and Trance
- Common Mistakes
- Feeding the plugin back into its own path
- Using the wrong Source setting
- Setting too much depth
- Leaving the trigger audible
- Expecting it to behave like a compressor
- Frequently Asked Questions
- Can LFO Tool do sidechain ducking in Ableton Live?
- Should I use an audio or MIDI source to trigger LFO Tool?
- How do I sync LFO Tool ducking to the project tempo?
- Why does my LFO Tool sidechain setup create feedback?
- How much LFO depth should I use for kick-triggered ducking?
- Is LFO Tool better than Ableton’s native compressor sidechain?
What You Need
Three things, and one of them is optional.
- Xfer Records LFO Tool installed as an Audio Effect. It runs on Windows and macOS in VST3, AU and AAX.
- An Ableton Live set with a kick and at least one track you want to move out of the way. A bass or pad is the usual target.
- A track to put the rack on that is not your master, unless you genuinely want the whole mix pumping.
Routing knowledge helps more than you would expect. If you have never used a Return track or a dedicated group in Session View, the second half of this guide will feel harder. YouTube is full of short Live routing walkthroughs, and watching one at double speed is faster than fighting the dropdown menus.
Device names shift slightly between Live 11, Live 12 and the Suite editions. The Audio Effect Rack and the Return track layout have stayed the same, but check your own version’s device browser if a menu is not where this guide says it is. Live 12.3 and later also renamed some stock routing devices, so trust what is in front of you over an old screenshot.
Step-by-Step: Set Up LFO Tool Sidechain Ducking
Choose the Track That Should Trigger the Duck
Start with the kick as your trigger, and pick the bass as the thing that gets ducked. That is the arrangement nearly every house and techno record is built on, and it gives you an easy reference while you learn the controls.
Send the kick to a Return track rather than dropping it straight into the plugin’s audio input on your bass track. In Session View, drag from the kick’s Sends section to a new Return. In Arrange View, create the Return, then either drop the kick into it or use a bus. Keeping the trigger on its own Return means the trigger level is adjustable without touching your drum mix.
Mute or solo that Return while you are auditioning. If the kick plays through as you work, you will keep hearing it twice and start turning things down for the wrong reason. Once the routing is right, the Return should be silent and LFO Tool should still be reacting to it.
Add LFO Tool to an Audio Effect Rack
Put LFO Tool on the Return track you just made. There are two ways to do this and both are fine.
The quick way is to drop the plugin directly on the Return. The better way, once the settings are working, is to drop an Audio Effect Rack on the Return first, then load LFO Tool inside it. The rack gives you somewhere to put a dry signal path, a parallel compressor, or an EQ for shaping the ducked signal later, without rebuilding anything.
Either way, the Return now carries audio that only LFO Tool sees. That is the separation that keeps this clean: the kick drives the shape, the bass passes through, and nothing feeds back into the drum bus.
Assign a Gain Parameter to the LFO
This is where beginners lose the thread. LFO Tool has a Volume section, and the curve you draw there is the ducking envelope. Nothing needs to be assigned by hand unless you are using the Modulation matrix to drive something outside the plugin.
For a standard house pump, start with these values and change one at a time:
| Control | What it does | Starting value |
|---|---|---|
| Source | Where the envelope comes from | Tempo Sync, 1/4 |
| Depth | How far the volume drops | 6 to 9 dB |
| Attack | Time to reach full duck | 0 ms |
| Release | Time back up to normal level | 180 to 250 ms |
| Phase | Offset from the downbeat | 0 |
| Mix | Dry versus processed | 100% wet while setting up |
Switch Source from None to Tempo Sync, then pick a 1/4 note division so the envelope repeats once per beat. Ableton Live pushes its tempo to the plugin over the standard tempo sync channel, so changing the project tempo moves the duck with it automatically.
Set Depth somewhere between 6 and 9 dB to begin with. It sounds timid, which is the point. Go deeper later, once the timing feels right. A 12 dB duck on every beat is the reason people complain that everything modern sounds exhausting.
Leave Attack at 0 ms so the duck arrives with the kick rather than after it. Set Release between 180 and 250 ms so the bass comes back before the next hit. Shorter release gives you the trance gate stutter; longer release gives you a smoother, slower swell.
Route the Sidechain Signal and Blend the Effect
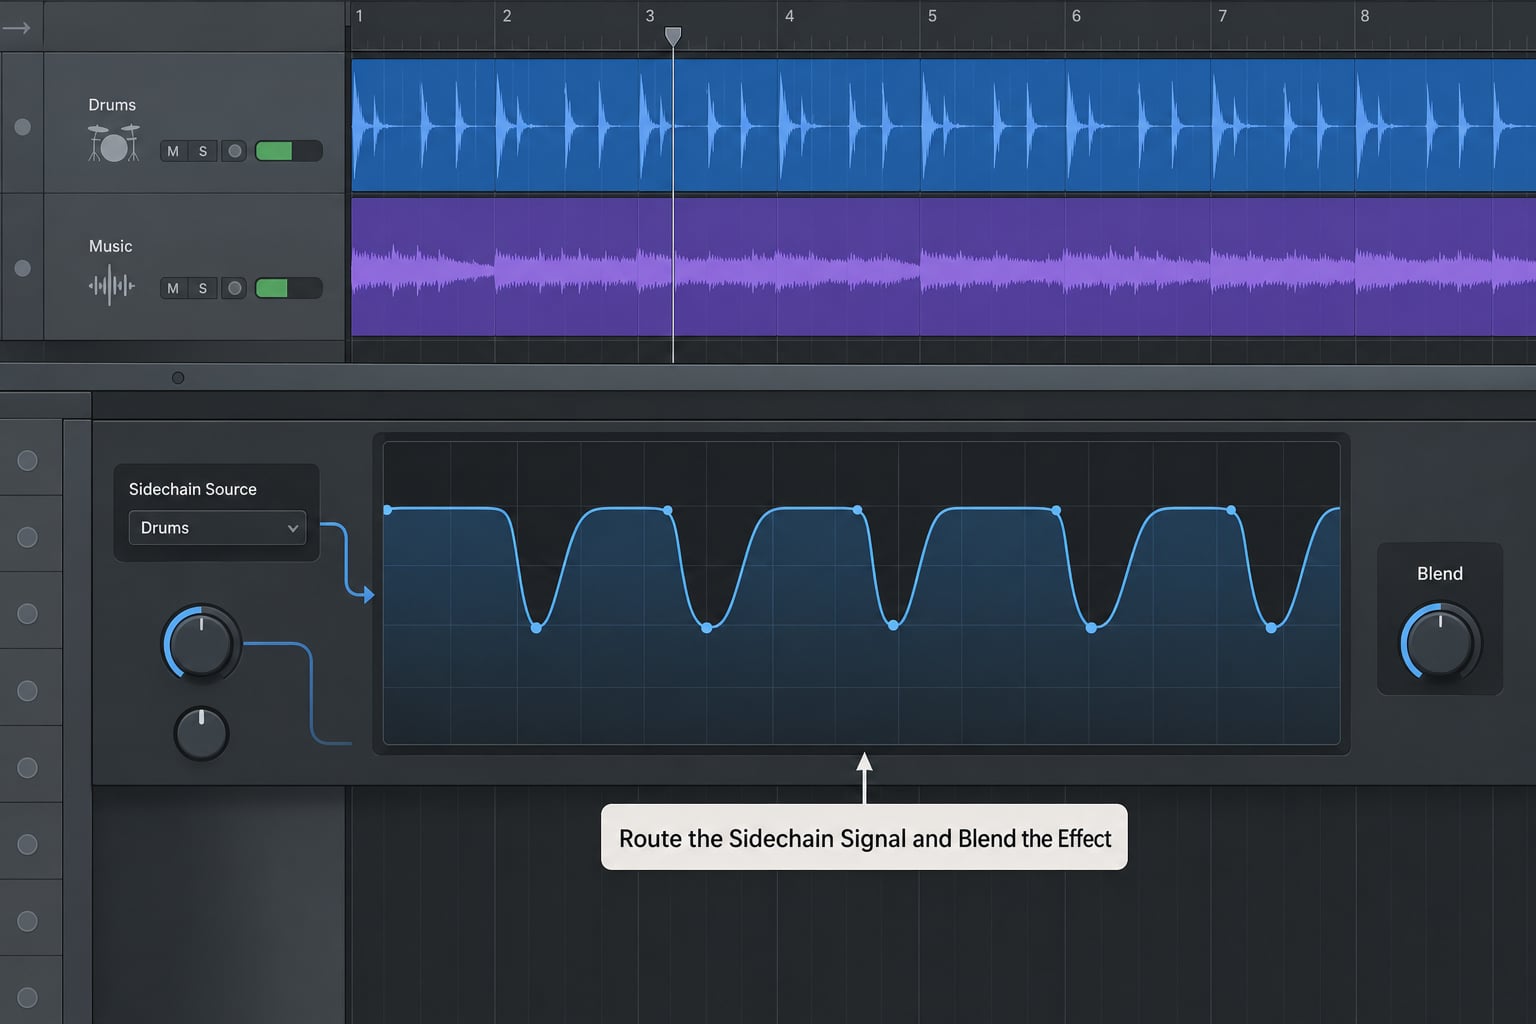
Tempo Sync is the reliable starting point because it needs no routing at all. When you want the duck to follow a real kick that is not sitting exactly on the beat, swap Source over to Sidechain and feed it the audio from your kick Return instead.
With Sidechain selected, LFOTool watches the incoming signal and shapes its volume around it. The envelope no longer repeats on a grid, it follows whatever hits that input. That matters for live-recorded or humanised drums, and it matters whenever you nudge the kick off the grid.
Watch the level meter on the sidechain input while you play. If it never moves, the trigger is not arriving. If it sits pinned, the trigger is far too hot and the duck will behave oddly.
Drop Mix back from 100% to somewhere around 70 to 80% once the movement feels right. Partial mixing is useful because it lets a little of the un-ducked signal through, which keeps the bass present under the kick instead of vanishing. Pull the wet level back until you can hear the duck clearly but the track still feels like one continuous sound.
Refine the Ducking for House and Trance
For a tight house pump, keep the 1/4 division and trim the release toward 150 ms so the bass recovers quickly and the pattern stays busy.
For trance, go the other way. A release of 400 to 600 ms on a 1/2 or whole-note division gives the long gate swell that genre is built on. You can draw the curve by hand for a shape that dips twice per cycle rather than once.
Try automating Depth on an automation lane instead of leaving it fixed. A little movement across a phrase keeps the pump from feeling mechanical, which is the same reason producers back the constant version off entirely after a while.
Finally, remember that Tempo Sync ducking and sidechain audio ducking are different tools. Use Tempo Sync for regular grids and genre patterns. Use the audio input when the kick moves, when you are playing live, or when the pattern is syncopated rather than straight.
Common Mistakes
Feeding the plugin back into its own path
Symptom: the mix hums, distorts, or the duck chatters wildly.
Fix: the sidechain input should come from a Return that is not carrying the ducked audio. Mute that Return, play, and if the duck still works you have the routing right. If the hum disappears when you mute it, you have a loop.
Using the wrong Source setting
Symptom: nothing happens at all, or the duck fires on a schedule regardless of your drums.
Fix: check the Source dropdown reads either Tempo Sync or Sidechain, not None. Solo the trigger Return and watch the plugin’s input meter while you hit play. A moving meter with no audible duck means Depth is at zero.
Setting too much depth
Symptom: the bass disappears on every beat and the track sounds hollow.
Fix: drop Depth by 3 dB and listen at low volume. If you have to strain to hear the duck, it is too deep. Forum consensus across production threads is consistent on this point, and it is the single most common complaint about over-ducked mixes.
Leaving the trigger audible
Symptom: you keep adjusting volume in the wrong place because you hear the kick twice.
Fix: mute the kick Return. You should hear one kick, from your drum bus, and a moving bass underneath it. That is the whole test.
Expecting it to behave like a compressor
Symptom: the bass sounds level-matched but lifeless, or you miss the dynamic response you get from a real sidechain compressor.
Fix: a volume shaper imposes an envelope on the audio, so it cannot react to dynamics at all. Quiet kick hits duck exactly as hard as loud ones. If you want that reaction, or you want to duck only the low band of a wide bass sound, use a compressor sidechain or a multiband compressor instead. Plenty of experienced producers go back to a plain compressor for exactly this reason.
Frequently Asked Questions
Can LFO Tool do sidechain ducking in Ableton Live?
Yes. LFO Tool ships with Live as a Max for Live preset, but it also loads directly as a VST3, AU or AAX Audio Effect on Mac and Windows. Drop it on a Return track, choose Tempo Sync or Sidechain as the source, set your depth and release, and route the ducked signal into it. The manual describes the sidechain function as letting the LFO modulate audio in sync with another audio source.
Should I use an audio or MIDI source to trigger LFO Tool?
For most people, tempo sync or an audio sidechain input covers everything. Audio triggering follows real drum hits, so it survives off-grid grooves and live playing. MIDI note triggering is useful when your kick comes from a MIDI clip you control precisely, since the envelope lines up with the sequence rather than the audio. Test audio first, because it is simpler to route and easier to debug.
How do I sync LFO Tool ducking to the project tempo?
Set Source to Tempo Sync and pick a note division such as 1/4 or 1/2. Ableton sends the project tempo to the plugin over its standard tempo sync channel, so the envelope follows whenever you change the project tempo. Keep Phase at zero to line the duck up with the downbeat, then nudge it if your kick is layered slightly behind the grid.
Why does my LFO Tool sidechain setup create feedback?
Almost always a routing loop. The sidechain input is usually being fed from a bus that also carries the audio LFO Tool is processing, so the plugin keeps reacting to its own output. Mute the trigger Return. If the distortion and chatter vanish, that was the problem. Keep the trigger on a separate Return from the ducked track and the feedback disappears.
How much LFO depth should I use for kick-triggered ducking?
Start between 6 and 9 dB and widen from there. Deep constant ducking on every beat is the reason pumping mixes get criticised as tiring, and the fix is usually pulling depth back rather than shortening the release. If the bass disappears on each hit instead of stepping aside, drop the depth by 3 dB and listen again at low volume.
Is LFO Tool better than Ableton’s native compressor sidechain?
They do different jobs. A compressor sidechain reacts to the actual level of the trigger, so it ducks in proportion to how hard the kick hits. LFO Tool imposes a fixed envelope, which is perfectly timed and predictable but cannot respond to dynamics. Producers chasing the classic EDM pump often prefer the shaper, while those wanting transparency and dynamic response stay with compression.
Build it once with a short release and low depth, get the timing right, and only then push the depth up. Most people who end up disliking LFO Tool ducking simply went to 12 dB on the first pass and never came back down.